Monday, April 18, 2011

Low Carb Pancakes

To anyone still following my blog, I apologize that the posts have been few and far between.  Since it is hard to find time, I am trying to regularly post one of my favorite recipes or low carb experiements that turn out to be a definate success.  This recipe falls into that catagory since pancakes are generally not going to fall in the low carb catagory.

I experiemented and adapted some low carb pancake recipes I found to come up with a low carb pancake mix that tastes great.


1/4 C Almond Flour
1/4 C Coconut Flour
1/4 C Low Carb Baking Mix (Bob's Red Mill Brand)
2 Tbsp Whey Protein Powder
1/8 tsp Nutmeg
1/4 tsp Cinnamon
1/2 tsp Baking Soda
1/2 tsp Baking Powder
1 tsp Truvia/Erythritol (or preferred sweetener)
1/4 tsp salt
2 Large Eggs
2 Tbsp Coconut Oil, Melted (or melted butter)
2 Tbsp Half and Half (or cream)
1 Cup Coconut Milk (or almond milk)
1/8 tsp vanilla (omit if you are using vanilla flavored whey)

Total Batch = 18-20 Net Carbs
Makes 8-12 Small/Meduim Pancakes @  2-3 Net Carbs Each
Serving Size = 2 Small/Medium Pancakes (4-6 Net Carbs)

Mix the dry ingredients in a bowl.  Beat the eggs in a seperate bowl.  Then add all of the remaining wet ingredients to the eggs except the coconut oil/butter.  Just before you are prepared to mix the wet and dry together add the melted coconut oil/butter to the wet ingredients then add the wet to the dry.  Mix until you have a batter.  If your batter is too thin add some more coconut flour, if it is too thick add some more coconut milk.


I used an electric skillet which I set to 325°F.  Once hot (spritz a few drops of water to verify that it is hot enough, the water should jump around wildly then evaporate quickly) pour approximately 1/4 Cup of batter on the skillet.  Use your spoon to spread the batter into a thin layer otherwise the pancake will end up too thick and won't get done in the center. 


I found that slightly less than 1/4 Cup yielded these nice small pancakes.  Let the pancakes cook until the bubbles on the top start to form and the bottom is browned.  It takes awhile for the pancake to cook enough to be able to flip them without making a mess. 

Cook until browned on the other side then serve.


Low Carb Topping Ideas:
-Peanut Butter
-Over Easy Eggs (if you prefer savory over sweet)
-Sugar Free Syrup
-Low Sugar/No Sugar Added Preserves
-Fruit & Whipped Cream

Thursday, April 7, 2011

Roasted Asparagus

Drop that steamer, put the asparagus on the counter, and slowly step away. Don't even think about putting that lovely asparagus in a steamer or pot of water.  Follow these directions very carefully and nobody will get hurt:

1.  Preheat oven to 400°F.
2.  Wash asparagus and snap off ends.
3.  Lay on a greased cookie sheet and brush with olive oil.
4.  Season with salt, pepper, garlic powder, and ginger powder.
5.  Sprinkle shredded Parmesan cheese on top.


6.  Pop in the oven for 10-20 minutes or until it reaches your desired crispness/tenderness.  (I prefer mine just in between crisp and tender so I usually bake for around 10-12 minutes.

You are now free to enjoy the world of roasted asparagus.  The only downside is that you have likely now learned the "err of your ways" from back in the days of the steamed/boiled asparagus.  I hope you enjoy as much as I have.

Friday, April 1, 2011

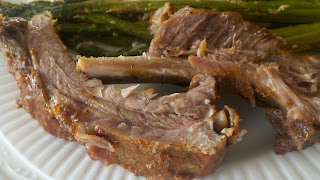
Oven Baked "Fall-off-the-Bone" Baby Back Ribs

Ingredients:
1 Rack Baby Back Ribs
Signature Dry Rub

If you are low carbin', I recommend making your own dry rub since most pork rubs have brown sugar or some kind of sweetener. Just blend together your favorite seasonings to get the desired mix of salty, savory, & spicy flavors.  Besides, making your own dry rub will automatically give you some "street cred" among the Southern BBQ folks. Have fun with it and come up with a catchy name for your signature rub.  If you must have some sweetness, then you can blend in some sugar alcohols or artificial sweetener. Personally, I'll leave the sweet stuff to the folks in Kansas because here in Texas sweet BBQ makes less sense than a screen door on a submarine.

"Art's Country Engineered (We Ain't in Kansas Anymore) Texas Dry Rub Recipe"
1 tsp Salt
2 tsp Black Pepper
1/2 tsp Red Pepper
2 Tbsp Chili Powder
2 tsp Garlic Powder
1 tsp Fajita Seasoning
1/2 tsp Paprika
1 tsp Onion Powder

First remove the tough skin/membrane off of the back of the ribs.  Take a small knife and insert it between the skin and meat (just under the skin) in the center of the rack. Make the slit between two center ribs and cut it deep enough to fit a finger into.  Slide your finger between the skin and meat and pull the skin off of the ribs.  This should enable you to remove the entire membrane in one piece. Might take a bit of muscle, but it should come off without too much struggle. Grunt loudly and finish with a carnivorous roar as you rip off the membrane to make sure you scare your guests a little bit and live up to your newly earned "Street Cred".

Next lay the ribs on a piece of aluminum foil and coat the entire rack of ribs (top/bottom/& sides) with your signature dry rub. 

Wrap the ribs tightly and place in the oven @ 275°F for 3-1/2 to 4 hours. No need to turn them or do anything but wait patiently.


Slice and enjoy.  The meat should be extremely tender and almost falling off the bone. The only downside is you will probably wish you would have done 2 or 3 racks of ribs.

Warning-Don't let too many people know that you cooked the ribs in the oven or you might loose some of that "Street Cred" mentioned earlier.  These ribs might not have that amazing smokey flavor of ribs smoked over a mesquite fire all afternoon, but they are very simple to prepare and are sure to please.

Tuesday, March 22, 2011

Thai Chicken Curry Soup


There isn't much I like more than some Thai curry poured over some rice. Since I can't have the rice, I made this easy curry soup and was impressed with the results.

2 Cans Coconut Milk
2 Cans Chicken Stock
1 tsp minced ginger
1 Tbsp Red Curry Paste
1 Pkg (5-8) Chicken Thighs
1 Red & Yellow Bell Pepper
1 Onion
1 Can Bamboo Shoots drained
1 Zucchini
6 Limes
Cilantro
Fish Sauce
Sriracha Sauce

In a pot add the coconut milk and chicken stock and heat to a simmer.  Add the ginger and curry paste.  Slice the chicken, onion, bell pepper and zucchini into strips (I usually shoot for 2" long x 1/2" wide or less). Add the chicken slowly to the pot and let simmer for a few minutes.  Then add all the vegetables and simmer until they are the desired tenderness.  Reduce heat to low and add 2 Tbsp of fish sauce, 1 tsp Sriracha, and the juice from 1 lime.  Cut the remaining limes into wedges and serve the soup with lime, cilantro, fish sauce, & sriracha for garnish.


Tuesday, March 8, 2011

Sun Dried Tomato, Bacon, Feta, & Spinach Low Carb Quiche

Sun Dried Tomato, Feta Cheese, Spinach, & Bacon Quiche with Low Carb Almond Meal Crust

Almond Meal Crust:
*1-1/2 C Almond Meal or Almond Flour
3 Tbsp Ice Water
4 tsp Olive Oil

*Tip almond meal (w/skins) and almond flour (blanched/skins removed) can be interchanged. You can make your own almond meal by grinding almonds in a food processor or coffee grinder. Make sure you don't grind the almonds too long or you will end up with almond butter. Grind the almonds in steps using a sifter to sift out the flour and returning the larger bits to the grinder.  If you purchase almond meal/flour, I recommend buying it in bulk from Whole Foods/Central Market/Sun Harvest/ect because the per pound cost is generally cheaper. Always store in an airtight container because ground almonds can become rancid.

Mix almond meal/flour and salt.  Above picture is almond flour purchased from Sun Harvest.  Beat olive oil and water and add to almond meal/flour.  Mix until a dough forms.  Add more water or almond meal/flour as required to form a dough ball that is not too dry and not too sticky. 

Spread into a 9" greased pie plate.  Dip your fingers in ice water to keep them from sticking when pressing out your crust. 

Cousins (Merlin & Bailey)
Warning, you likely won't have alot of help during this phase of the project. I caught my helpers sleeping on the job. "Lazy Bums"!!!! Just wait, when this comes out of the oven everyone will be begging.

I recommend covering the edges of the pie with pie covers or just aluminum foil to prevent the edges from burning or getting too dark.  You must exhibit lots of patience if you use aluminum foil, otherwise you will end up very angry because they tend to fall off while placing in the oven.

Bake @350 for 15 to 20 minutes or until it starts to brown.  While the crust is baking work on the filling.

Quiche Filling:
5 Eggs
1/4 C Coconut Milk or Almond Milk
6 to 8 Sundried Tomatoes chopped
1/2 Cup Feta
1 Pkg Frozen Spinach
1 Pkg Bacon

Slice the bacon in 3/8" wide slices and fry until crispy. (If you have read the cast iron post, this would be a good time to use that skillet).  Drain the bacon on paper towels. 

Remove all but 1 Tbsp of bacon grease from the pan and add the spinach and cook until thawed.  Add the sundried tomatoes and cook for another 2 to 3 minutes.  Mix in the bacon and remove from heat.  In a bowl beat the eggs with the coconut/almond milk. 

Pour the spinach mixture into the pie crust.  Add the feta cheese and use a fork to mix the cheese in a bit.  Pour the egg mixture over everything and pop in the oven.  I once again recommend using the covers for the edge.  Remove the covers with about 20 minutes remaining.

Bake quiche 40 to 50 minutes or until eggs are cooked through.  Set out to cool and try to fight off all the hungry people that will be flocking to the kitchen due to the wonderful smell.

I was skeptical of the almond meal crust, but the concensus was that the taste and texture was amazing.  Several comments were that the almond meal crust is preferred over a regular crust.  Try it for yourself.  I'm thinking of using it for a low carb dessert soon. Im open to suggestions.

Tuesday, March 1, 2011

Seared Butterflied Salmon Steaks

I love Salmon but for some reason I had difficulty getting it to cook perfectly.  If you remove it from the skin then it will fall apart.  If you leave the skin on then the skin gets crispy and browned but the rest of the fish doesn't get that great seared crust.  I discovered this technique for cutting and preparing the salmon so that you get a nice crisp crust and a nice flaky center.

Buy a 6 to 9" long piece of fresh salmon fillet. Ask the butcher to cut you off the thickest part of the salmon (try to get the forward most part of the fillet where it is thickest and widest.  Preferably you want the salmon to be at least 1.5" thick.

Butterfly Technique:
Cut the salmon in 2-3" wide strips all the way through the skin.


Then take each piece of salmon and prepare to make another cut 1-1.5" from the edge, directly in the center of the fish. This cut should run lengthwise. When you make this cut, only cut through the flesh down to the skin, but do not cut through the skin.


The fold the salmon in half so that the skin is folded back to back.


Season both sides of the steak with salt, pepper, garlic, and ginger powder. 


Heat up a skillet and put 1 Tbsp olive oil in the pan.  When the oil is hot (just before it starts to smoke), add the steaks to the pan.  Place the steak so the open side of the fold is facing down.  This will allow the fish to sear and help hold the butterflied steaks together nicely.


For medium to well done grill the steaks 2.5 to 3 minutes on each side.  For rare to medium rare grill the steaks for 1.5 to 2 minutes on each side.


You don't have to hassle with removing the salmon from the skin for presentation as it is ready to serve.  It also makes it very easy to eat as you just slide your fork next to the skin to remove the fish bite by bite.

Wednesday, February 23, 2011

Grilled Pork Loin Chops

If you are trying to earn a cool nickname try serving this winning dish to your friends and maybe you will be known as "Pork Chop".  Even though it didn't work out for Costanza, it might turn out better for you.  Just make sure you don't serve them with a side of string beans or a bowl of beanie wienies.  That could backfire.


Grilled Loin Chop w/Steamed Broccoli and Sauted Spinach
Pork loin chops (To save a few bucks, buy a pork loin on sale and slice it into 3/4" chops yourself)
I have saved some dough by purchasing the entire pork loin from Sams Club which is generally about 2 to 3 feet long.  I then divide it into thirds.  One third I will make a pork loin roast, the other some sort of stuffed loin, and the last third I slice into chops.

I like to slice these loin chops thick so that they will remain juicy after cooking.  The cooking process should aid at keeping the chops moist.

Season the chops with Salt, pepper, garlic powder, red pepper or your favorite blend of spices.

Preheat oven to 350°F. Place a tablespoon of oil in your cast iron pan on high heat.  Let the pan get hot then add the chops.  The goal is to sear the chops.  Let the chop sear for 1 minute, then flip and sear the other side for 1 minute.  Pull the pan off the heat and place directly into the oven for 20 minutes or until meat is cooked through.

If you like saving money and cooking healty, check out this blog, cheaphealthygood.  It has become one of my favorites for saving some bills, paper, bacon, honk, roll, sawbucks, moolah, rock, benji's, chedda, C-notes, scratch, bread, smackeroos, or samolians.  I will take on the smug e-surance guy anyday!!!